Simulation Approval Protocol
for Aligners

Part I: Review malocclusion & treatment stages

In many cases, patient identification can be confused, names can be misspelt and genders reversed. Please review that all data is correct and ensure that this is a regular protocol even if it seems trivial.
Check that all records are complete and that a full orthodontic data set has been provided to the aligner company. This includes intra and extra-oral pictures, study models, bite registration and radiographs, including OPG, periapicals, cephalograms and CBCT if needed. Do not start treatment without an OPG, as this helps in determining root length, supernumeraries and impacted teeth. If the records are old, it is important to update them.
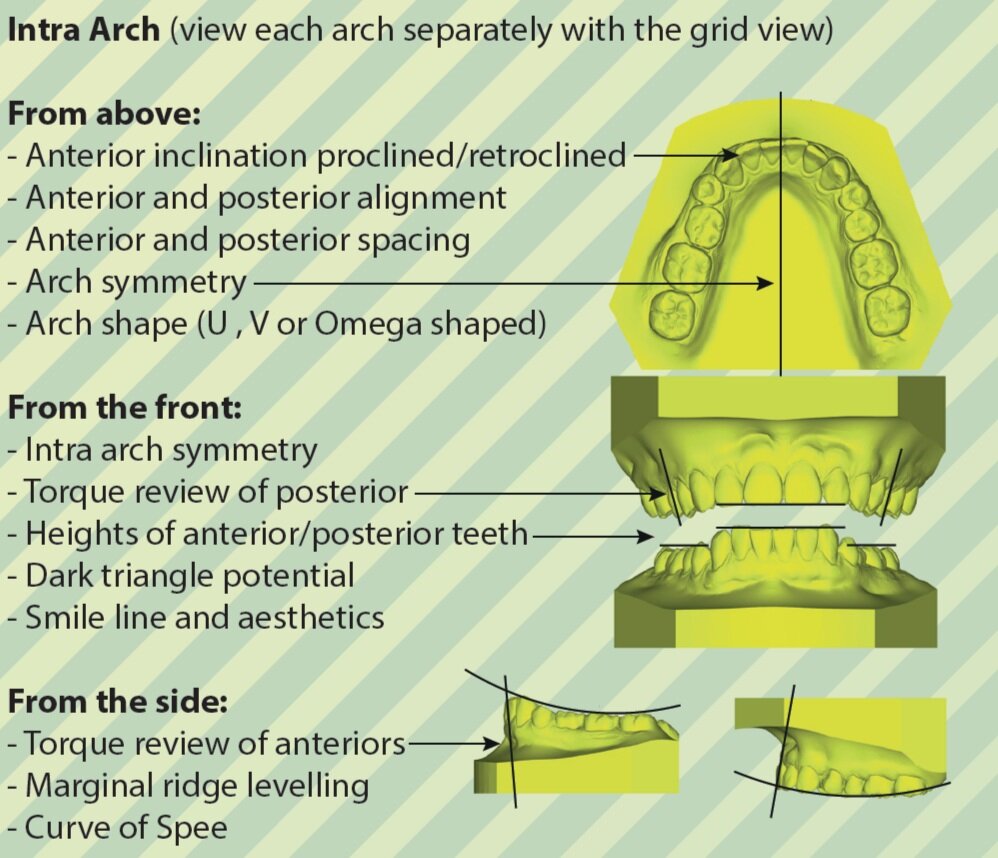
We advise our students to count teeth out in every case, as there are numerous simple errors which start from hastily started treatment planning.
Double-check the dentition with regards to restorations, missing teeth, periodontal problems and any decay. Refer patients for dental care prior to any orthodontics.
Ensure that the clinical bite and the recorded bite are the same. In many cases, aligner companies may just fit the models in a “best fit” and may skew the treatment planning.
This is extremely important. Always send a bite registration to the aligner company and indicate that you want the models to be digitally articulated to that bite.

Bolton’s discrepancy review is usually overlooked in contemporary aligner treatments.
Two types of Bolton’s analysis exist. One is anterior and one is full arch.
Why use Bolton’s analysis?
- To ensure correct tooth size and arch fit.
- To decide between IPR or prosthetic build-ups.
- To find out where spaces should be left for build-ups.
- To check molar-incisor relationship discrepancies.
How to do it?
Measure the upper and lower mesio-distal widths. Divide the total of the lower arch by the upper arch and compare to norms. In most aligner software, this calculation should already be done. Please collate this with your own results as sometimes errors exist.
Total MD widths of the lower 6-6 (or 3-3)
Total MD widths of the upper 6-6 (or 3-3)
Anterior norm: 77.2%
Full arch norm: 91.3%
If the value is higher than the average, then it means that there is an excess of lower tooth structure or a deficit of upper tooth structure. In either case, one arch may need to have build-ups done, or there may be a need for interproximal reduction. In many aligner therapy methods, IPR is used injudiciously. If the patient has the correct ratio of tooth structure as per the Bolton’s analysis then the same amount of IPR/build-up should be done in both arches so as to honour the ratio and ensure correct canine, molar and incisor relations.
If the value is lower than the average, then it means that there is an excess of upper tooth structure or a deficit of lower tooth structure. The possibility to change the treatment plan is highly likely in a way that you can direct IPR to localised areas that have an “excess”. Alternatively, one can plan to avoid the IPR completely and consider a build-up in the opposing arch. This is commonplace in cases where there is multiple spacing in the anterior maxillary dentition but none in the lower, cases that have diminutive incisor(s).

Always check the comments tab. This is something very important, as sometimes the aligner team has stated limitations, impression errors, time constraints, etc.
Remove all indications of IPR and attachments, view the malocclusion by itself and use your experience to decide what would be ideal. It is a good idea to write down the teeth you would put attachments on, and where you would do IPR if you were the aligner technician.
This is important as it needs to be confluent with what they have come up with, else there will be a misunderstanding. Do not allow their treatment plan to direct yours; in orthodontics, theirs should complement yours. You must be in control.
Whenever treatment planning, ensure that models, radiographs and pictures are at hand. Having multiple screens open during this can be so helpful, although perhaps demanding to the clinician. Opening and closing windows can be a distraction otherwise. Second opinions are also something that can assist.
Visualise your own end treatment before you check the end position from the simulation. This gives you an insight into the mechanics needed, where attachments are required and where/how much IPR is needed. It is so important to visualise the treatment yourself, as it will enhance your experience and YOU will be more in control.
In some aligner companies, certain attachments are already prescribed and IPR is planned. DO NOT agree to this, unless it works with your treatment plan and with the biologic limitations of the patient. This includes the periodontal as well as skeletal limitations. Never accept without correlating against your treatment plan.


In some cases, you may not want to move teeth or you may want to keep spaces open in certain areas. Implants should not be moved and heavily restored teeth perhaps should be moved with caution.
The beauty with aligners is that you can move teeth independent to others. This is unlike in braces where the movement causes a reciprocal force as per Newton’s 3rd Law.
Teeth with large restorations can have the fillings detached, crowns have difficulty in bonding attachments and bridges have complex mechanics that are perhaps best left untouched and advised as immovable. The bonding protocols used in the world of orthodontics are diverse; some are specific to materials, others are universal. These can provide enough force for an aligner to keep engaging and disengaging without dislodging the attachment, so do not completely ignore these teeth.
Plan pontics carefully; ensure the size is correct as well as the shape of the missing tooth. In some aligner systems, composite is placed into the aligner so as to mimic the missing tooth. In this situation, it is imperative the shade is checked and the respective composite is available. The situation with lab encased pontics, shade should have been provided.
When derotating or correcting extrusions (especially in deep bites and open bites), please ensure that you overcorrect. Remember that you must make sure your simulation looks like your mechanics, NOT like your end result. If the two look the same, you are lucky and the treatment is simple. Superimpositions are amazing in detecting heavy movements that should be overcorrected. Most aligner software have a superimposition button/version, which can indicate the largest movements.

The most difficult thing to look at is whether the patient is happy or not.
1) The patient’s chief complaint: must be specific, should not be vague (straight teeth, nice smile, Hollywood smile, etc.), should be achievable and should be given by the patient and not the wife/husband/3rd parties, etc. Make sure that the main wish is categorized in an itemized level; as in the primary goal, secondary goal and auxiliary goals.
Always downplay and over perform.
2) Their optimism/pessimism: some patients adapt well to complexities of treatment and some do not. Is it better to refer the patient if it is too difficult? In some situations, the most difficult cases are the mildest, so watch out for low IOTNs. Is it better to advise the patient against treatment, as it is so mild?
3) Possible dynamics during treatment: is there a possibility of change of location as this could cause a major impact on the treatment progress? Is someone else paying for the treatment? Some patients wish a certain type of treatment/system and may not accept anything different than what they have in mind.
4) There is no “end” to orthodontics: patients need to understand that treatment does not “end” and that relapse is considered inevitable. The amount and time are the only factors under control.

Part II: Review & correlate the end occlusion & treatment stages


Aligner Advice